Terminal Swager
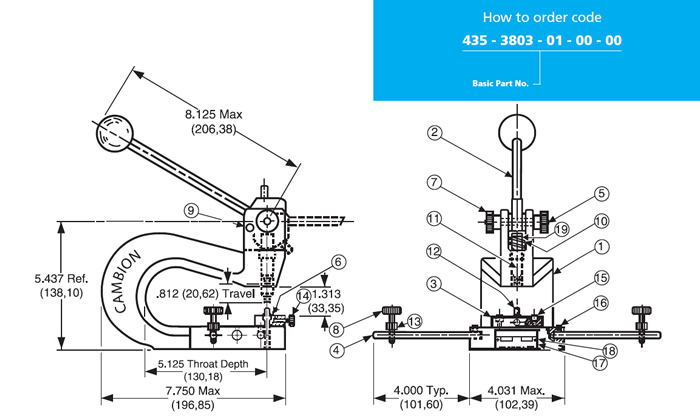
Bench Press Spares
| Fig. |
Description |
Part Number |
| 1 |
Base, Cast Iron |
430-3806-01-00-10 |
| 2 |
Handle Assembly |
430-3807-01-00-00 |
| 3 |
Anvil Plate |
430-3812-01-02-00 |
| 4 |
Board Support Rod |
430-3813-01-02-00 |
| 5 |
Cam Shaft |
430-3814-01-00-00 |
| 6 |
Brass Locking Pad |
430-3815-03-00-00 |
| 7 |
Domed Hex Nut (was thumb nut) (5/16 - 18) |
931-3684-01-29-00 |
| 8 |
Thumb Screw (10 - 24) |
330-3817-01-12-00 |
| 9 |
Spring Pin |
315-3811-01-00-00 |
| 10 |
Compression Spring |
345-3818-01-00-00 |
| 11 |
Punch |
See product pages for part number |
| 12 |
Anvil |
See product pages for part number |
| 13 |
Thumb Nut (10 - 24) |
310-3829-01-12-00 |
| 14 |
Set Screw |
330-1914-01-12-00 |
| 15 |
Machined Socket Head Screw (8 - 32) |
330-0176-07-12-00 |
| 16 |
Set Screw (8 - 32) |
330-1914-01-12-00 |
| 17 |
Name Plate |
610-5579-01-00-00 |
| 18 |
Drive Screw (No. 4) |
330-3820-01-00-00 |
| 19 |
Retaining Ring |
345-3821-01-00-00 |
| 20 |
Tool Kit |
390-0081-01-00-00 |
Tool installation instructions - Stage Instruction
- Loosen screws (15) in anvil plate (3)
- Install anvil (12) in anvil plate (3)
- Remove domed hex nuts (were thumb nuts) (7), cam shaft (5) and handle assembly (2)
- Install retaining ring (19) on punch (11)
- Install punch, inserting through compression spring (10)
- Reassemble handle assembly (2), cam shaft (5) and domed hex nut (were thumb nuts) (7)
- Bring handle forward so that punch (11) touches anvil (12)
- Line up punch and anvil by moving anvil plate (3)
- Lock anvil plate in place by tightening screws (15)
- Adjust anvil height by screwing into anvil plate, so that the clearance between punch and anvil, with handle all the way forward, is slightly less than the thickness of the board to be swaged
- Lock anvil in place by tightening set screw (14)
- Properly locate board support rods (4), (if needed) to fit board to be swaged
- Adjust thumb screws (8) so that the board will be level, and lock in place with thumb nuts (13)
